We couldn’t find anything for that search. But we’d love to know what you’re looking for — feel free to drop a comment on any post and tell us what you’d like to see next.
Home - Travel-Inspired Living - DIY Garden Sink Station: A Beautiful Project Using Old Pallets (9 Steps)
If you click on links we provide, we may receive compensation.
We link to affiliated partners at no extra cost to you.

There’s something incredibly satisfying about creating a space that’s both practical and full of character, and that’s exactly what inspired this little adventure. I’d been dreaming of a functional outdoor washing‑up area for ages — somewhere to rinse garden tools, wash veggies, or simply enjoy a bit of fresh air while doing everyday tasks.
When I stumbled across the rustic, stone‑and‑wood look that reminded me of countryside kitchens and Mediterranean courtyards, I fell in love instantly. Instead of buying new materials, I decided to give my old pallets a second life, letting their weathered texture and imperfections become part of the charm. The result is a garden sink station that feels deeply personal, beautifully sustainable, and perfectly aligned with the relaxed, home‑centered lifestyle I love.
Italians have a long tradition of repurposing materials in beautiful, functional ways. The rustic stone and weathered wood from recycled pallets are very “Tuscany farmhouse” or “Puglia courtyard”.
If you spend time outdoors — gardening, entertaining, cooking, or simply pottering around — an outdoor sink becomes surprisingly useful. It keeps the mess outside, saves trips back and forth to the kitchen, and adds a touch of rustic charm to your garden. And when you build it yourself, especially using reclaimed materials, it becomes more than just a utility feature. It becomes a story.
This project blends:
Functionality — a real working sink
Sustainability — recycling old pallets
Aesthetic beauty — stone, wood, and greenery
Lifestyle — outdoor living at its best
It’s the kind of project that makes your home feel more like you.
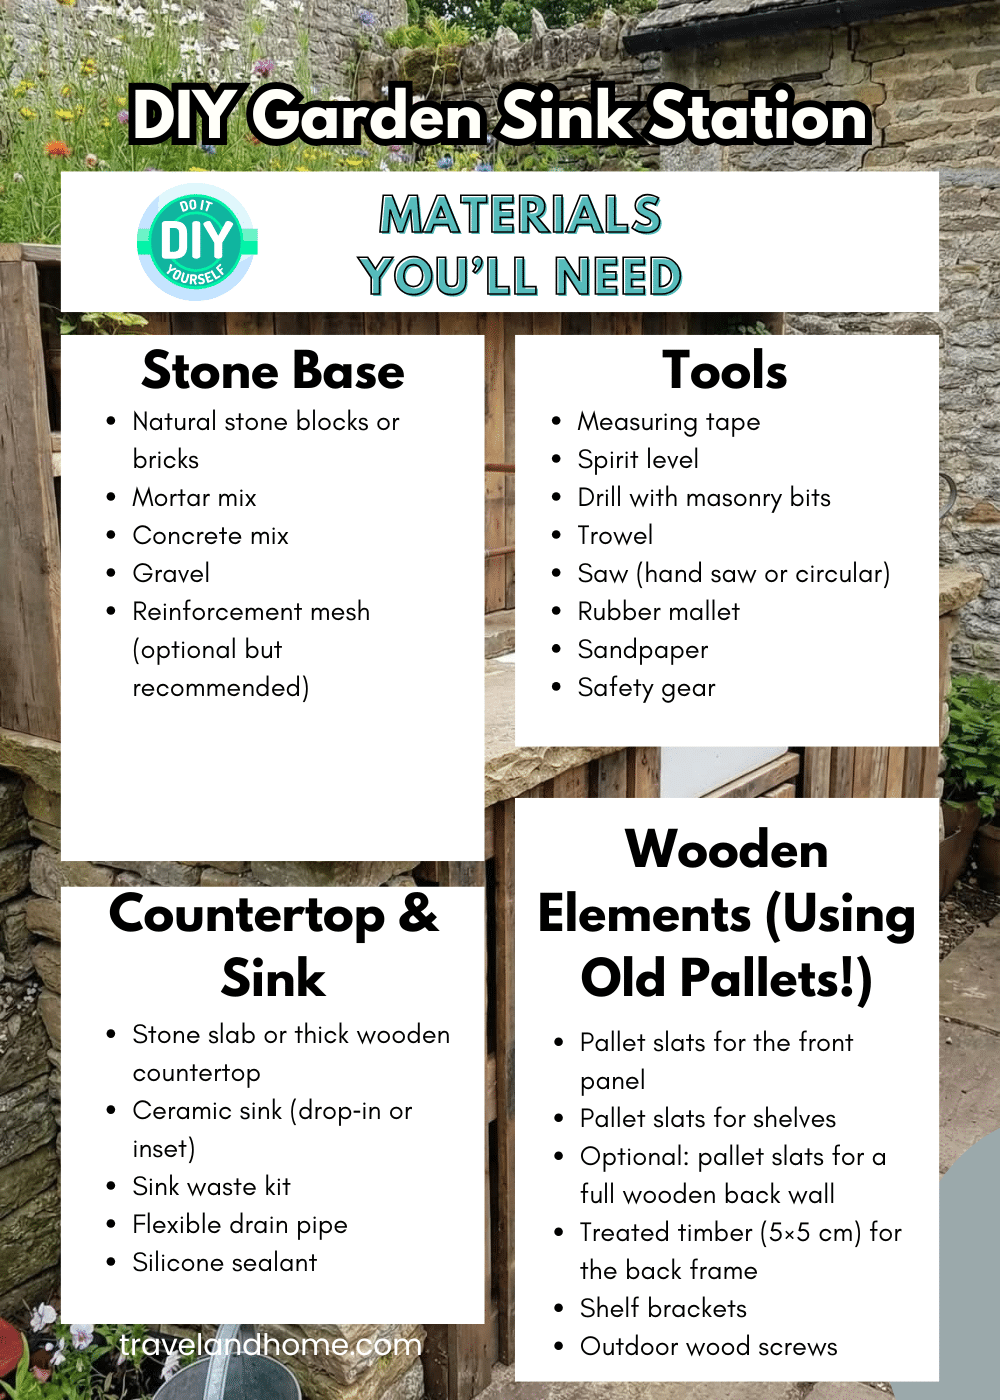
Shopping List
🛒 Bosch drill with masonry bits
🛒 I use a Bosch cordless saw for my DIY projects, and it can cut pallets to size. It’s more expensive to be cordless, but so much safer to use without the cable in the way.
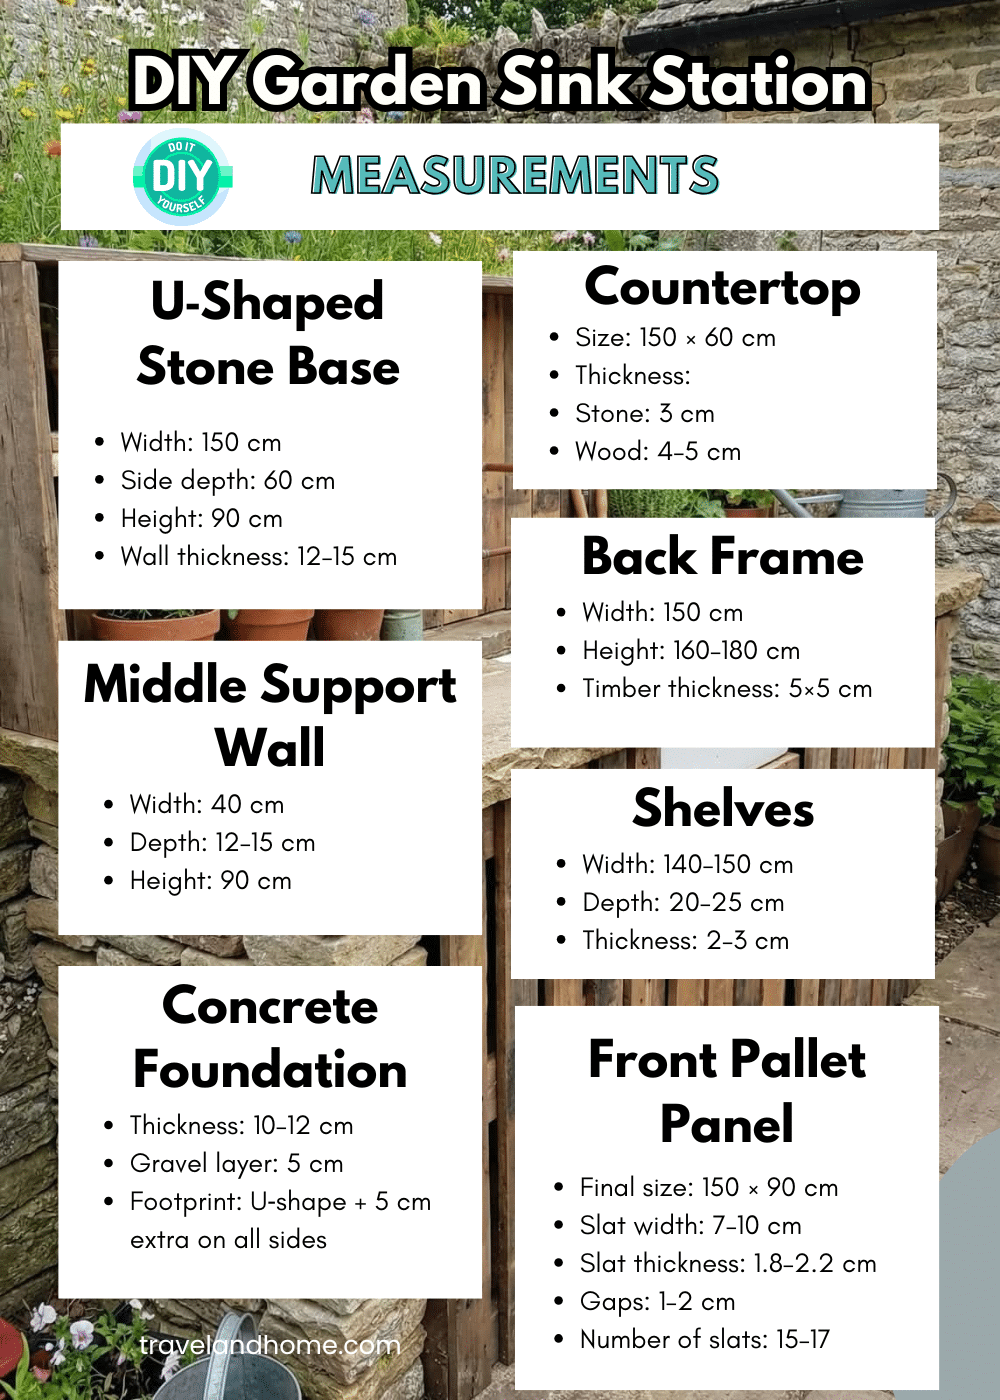
Dig a shallow U‑shaped trench, add gravel, and pour a reinforced concrete slab. This ensures your stone walls stay stable for years.
Dig a 10–15 cm deep trench in the U-shape.
Add 5 cm gravel and compact it.
Use wooden boards to create a mold for the concrete slab.
Mix concrete in a wheelbarrow.
Pour into the mold.
Add rebar or mesh for strength.
Smooth the surface and let it cure for 48 hours.
Pallets are held together with spiral nails that grip like crazy. The easiest method:
Pallet wood is rough, so give it a quick refresh:
Brush off dirt
Sand lightly with 80–120 grit (don’t over-sand — rustic is good)
Remove any nails
Treat with outdoor wood oil or stain later
Lay your stones with mortar, starting with the back wall, then the sides, and finally the middle support wall. Keep everything level and let it cure for 2–3 days.
Use a bucket to mix mortar: cement + sand + water.
Start with the back wall, then the side walls.
Apply mortar to each stone and tap into place.
Use a spirit level to keep walls straight.
Leave gaps for plumbing if needed.
Build a short wall in the center under the countertop for extra support.
Let the stonework cure for 2–3 days.
Buy a cut-to-size stone slab (granite, limestone).
Place it on top of the stone walls with mortar or adhesive.
Use treated hardwood planks.
Screw into the stone using masonry anchors.
Cut a hole in the countertop (if wood).
Drop in the sink and seal with silicone.
Connect drain pipe to a bucket or nearby drain.
Dismantle your pallets, sand lightly, and cut the slats to 90 cm. Screw them onto a simple 5×5 cm wooden frame, keeping 1–2 cm gaps between slats. Attach the frame to the stone walls using masonry screws.
Construct a tall wooden frame and secure it to the stone base. This will hold your shelves and give the station its signature rustic look.
Build the frame on the ground.
Lay pallet slats vertically on top.
Screw slats into the frame.
Drill into the stone walls using masonry bits.
Fix the frame to the stone using wall plugs + masonry screws.
Cut pallet slats to size, mount brackets on the back frame, and screw the shelves into place. You can leave the wood raw or stain it for extra protection.
Use light oak, driftwood grey, or natural pine stain
Seal with outdoor varnish or oil
Don’t sand too smooth — keep the rustic texture
This is where the magic happens:
Your station becomes a little outdoor sanctuary.
🕮 Suggested Read: If you loved this project, you may also enjoy our post about a DIY container garden, a slice of Marrakech in your own backyard.

Ask for help lifting heavy stones or slabs.
Practice mortar on a small test wall first.
Use gloves—stone and mortar are rough on skin.
Take your time—stonework is slow but satisfying.
There’s something deeply grounding about working with stone and reclaimed wood. Every pallet slat has a past life, every stone has its own texture, and together they create a space that feels timeless. This project didn’t just give me a practical outdoor sink — it added soul to my garden. It’s a place where chores feel lighter, creativity flows, and the outdoors becomes part of daily life.
And the best part? It cost almost nothing in wood, thanks to those old pallets waiting for a second chance.
I’d love to hear your ideas, your successes, and even your “learning moments.” Share your thoughts in the comments — or save this post for your next sunny‑day DIY inspiration.
Comments